November Happenings!

I have loads of little things in progress right now, but nothing finished just yet so it feels like I’m doing nothing >.<

So here’s just a smattering of pics of two things I’ve been working on.

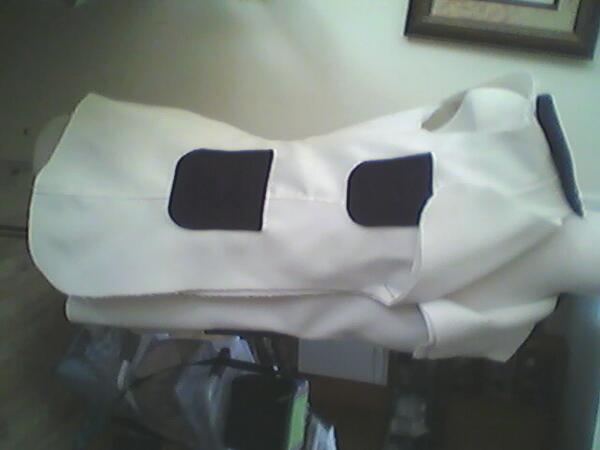
I posted this pic in one of the random pic posts before. The stooooory is, in December 2010 I went to Japan and thought I should make myself a lovely coat to wear there. This is as far as I got, that’s the liner in the pic, but the shell is at the same spot. When I went to set the sleeve I reeeeeally didn’t like the shape of the sleeve head, but I didn’t really have time to mess about with drafting a new one, and I wanted to add some things, aaaand I ended up getting a lovely wool coat on holiday sale anyway.

It’s B5425 from Butterick btw, view C cut at A’s length (also note, it’s going to hit just above the knees on me and I shortened it a few inches from the A cutting length, so it runs long).

Anyway, so got that other coat, folded this up to finish later aaaand… never got around to it ;_;
I’m very much deadline driven, so I have loads of half finished “real” clothes that get pushed aside for costumes or presents that have to be made at a certain time. It’s been sort of nagging at me since I moved though. Then one of the bloggers I read sometimes posted about finishing a quilt she started in 1991 and I was like whoa, I do NOT want that to happen to me! I need to go through my bins and finish what I want to finish and toss what I don’t.
Then I started to read Lladybird’s blog, and she has an excellent post on how she sews so much, and I realized that I *am* at my most productive when I do those things, I’d just never really thought about it before. But one of the things she doesn’t do, that I clearly do (did?), is allow UFOs! (UnFinished Objects)

So that long story really is just to say, I’m going to finish this coat XD

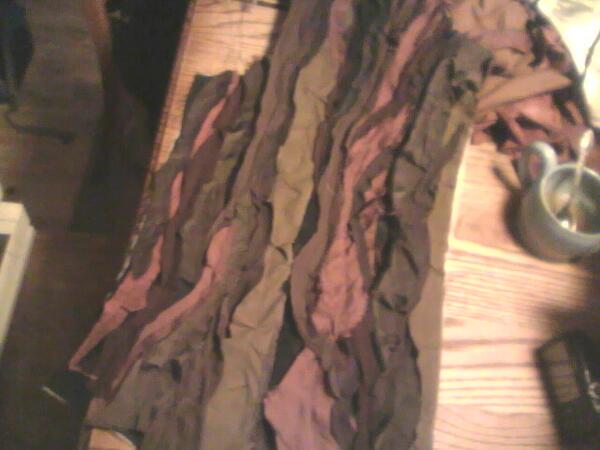
That fabric is like … twill weight. Which is nice, but not really coat-y. So I went to Joann to get some flannel to underline it with, and it happened to be 50% off, scooore.

More pics and rambling after the cut!

Read more

Country Regency Progress

Soooo, I talked about this dress awhile back here, in the plotting stages.
It’s basically done now, and I’ve been a TOTAL space cadet lately, combined with the crunch of getting it done in time means I didn’t take that many pictures. But here’s what I did take! And how I made it.

I started with Sense & Sensibility’s Elegant Lady’s Closet pattern, the gathered variant.

Progress shots! Read more

Upcoming!

Alright, so I have a few more backlogged posts in the pipeline, that all need something (mostly photo resizing and uploading ;_;).
Anyway, in the meantime, I thought I’d just ramble a bit about projects in the works, upcoming things.

Beyond trying to use up fabric with scraps, I have two new Regency dresses planned and another Black Canary variant for SDCC. One of the Regency dresses doesn’t warrant talking about at this time, there was going to be a very fancy tea put on by the Greater Bay Area Costuming Guild but they changed the venue, it will still have very nice tea I’ve been told, but it’s not half so fancy. So I put my fancy plans on the backburner and am working on a country dress!

My country dress is based on one Imogen Poots wears as Fanny in Miss Austen Regrets.

Source: Marie Williams via Mi on Pinterest

More rambling!

Read more

Convolution – Forest Fae

Still playing catch up, but hopefully some new projects will make their way in sometime soon. So I posted
this pic in my year cos review, but didn’t really talk about it:

(Photo by Chris Erickson) I talked about progress on the jacket and waistcoat here, and basically did more of the same until it was in a wearable state.

But I never posted about the horns and mask, so I’ll do that! And a few more pics from the event.


I started with forming the loose shape of the horns with aluminum foil, after looking at some pictures of antlers. Once I had a shape I liked I wrapped the foil in masking tape.


The next morning I discovered that masking tape was old D: and peeling away.


So I glued all the peely bits down and also coated the whole antler in a few layers of plain elmer’s glue.


Then I covered the whole thing in paper pulp, which is basically paper mache, but… pulped. I used that because I had it already 8D And it was sandable, which I thought could be useful.


Okay so the package did say there would be some shrinkage, but there was a LOT of shrinkage!


I ended up doing another layer or two, trying to really slather it on. That seems to be the end of my progress pics of the antlers. So after it was all dry, I had slathered sooo much pulp on, they were pretty lumpy 8D;; 

So I did file and sand them, but in the interest of time and laziness, decided not to get them smooth. And instead I dry brushed them with metallic gold. 

For the mask I started out with a sheet of green craft foam.


And drew a rough mask shape on it, free hand (which is why one side is much taller than the other… but I’m gonna write that off as “artistic”). I roughly shaped it using a hair dryer, putting the nose ridge and brow ridge in, and semi shaping the “branches.”


Then I painted the whole thing, front and back, with a mixture of black and gold paint as a base. And then I just took a variety of brown paints I had on hand and started painting streaks, mixing colours as I went.


I just kept going until I liked how it looked.


There’s a cell pic I posted earlier, which is basically how it turned out. 

To finish it off I glued it to a plastic store bought mask I had, because I realized the foam would tear where the holes/ribbons are. Then Convolution!


Judy used her Regency dress and added wings and a fabulous headdress and I love it!


With flash~


Judy wasn’t keen on how her wings had turned out, and literally threw them away on the way out!


Then a wild Mette found them 8D I don’t know. 

 Aaaaanyway, I definitely still consider this costume a Work In Progress! I have grand plans for it, and am thinking about returning to it soon…

Cos update – Jo Grant

I have been the most terrible at taking pics of this my current project. So. I’ll just talk a bit I guess.

So I decided to make this Jo for Gallifrey, I flip flopped on it for awhile because I wanted something new, but didn’t know what I might have time for, etc.
But it ended up working out, I found something that looks like wool but isn’t wool at the local fabric store, for a reasonable price, so then I had to 8D
Details!

So I had this pattern:

Which seemed pretty close, despite being 30 years off.

I cut out the relevant pieces, changed the trousers to be more belled than stove, cut out a muslin and tried the whole thing on. The trousers were almost perfect from the get go, which was nice, and the jacket really only needed adjusting in the lapel and collar. Oh and the back, she’s got a yoke with this pattern doesn’t have. But I flat patterned that in for the muslin and only had to change the height by an inch or so.

My lone progress pic, and on its side no less.

Hopefully I’ll finish by this weekend 😀

Current Project!

So my next day in travel is really daunting ‘cause we took like 1000 pics (we did the Rome circuit at a run basically) so I keep putting it off. So much so, that I’m actually going to post progress pics of what I’m working on right now.

Whoooo current! So this project is pretty much a challenge to myself, on multiple levels. I wanted to use up fabric (so no buying anything fabric for this), I wanted to work more with creating my own textiles (inspired by the awesome art quilts I keep seeing), I wanted to create something out of my norm (organic and not about the clean lines), and I wanted to create a fairy that wasn’t a corset with stuff shoved under it.

Right now I’m succeeding with using up fabric, and not being clean about it (uh, it is, in fact, a mess). So just a heads up, a lot of these were taken at night so the lighting is just… weird. And I didn’t want to muck about with fixing it. I started with a pile of fabric:

And went from there!


The same pile, with flash:


 Okay actually I started with cutting a loose vest shape based on a diagram in The Cut of Men’s Clothes, a 1770s-ish one if I remember right.


And a roll of stabilizer. I intentionally cut it big, for shrinkage, but actually I ended up cutting a LOT off later (which I should have taken a pic of, but didn’t). Anyway, then I just kept cutting strips in the various fabrics and semi places them.

And stitched the strips on!


 I had a full size pic of it more complete, but it was super blurry. Here’s the back:


Oh here is a cellphone pic:

Anyway, so then I thought this needs pockets.


For the back of the waistcoat I was going to put lace ups… here is a really not great pic to show how I failed at grommeting.
 
So I did button holes instead, but I don’t seem to have taken a pic of that. And then on to work on the jacket!


I cut leaves while watching Batman: Under the Red Hood (again) and crying on the inside.


This was not enough leaves, and I still have more to go, but it was a start!
 
This was again loosely cut out after looking at the diagrams in my book, and modifying the pattern I made for my 1850s coat for Dickens last year.


Basically I just used the back from my old pattern and eyeballed the front…


And now cell phone pics!


Alright! I’m further along, but I guess I haven’t been taking as many pics as I thought. We’ll just… see where this goes….

Spring Regency, the begninning!

Little bit of post-crossposting to kick off my blog, so things that are future tense actually already happened!

May 18th there’s a Regency Ball celebrating the 200th anniversary of Pride & Prejudice to which I’m going. Nervous about the dancing bit, but lots of lovely ladies in Regency wear?

OKAY.

Naturally I wanted to make something new, so I bought this saree but when it came it was quite a bit lighter and also the stripes weren’t variegated. I had planned on pairing it with a blue, maybe like a dark royal blue or something a bit peacocky. Anyway, with the colour it actually was I couldn’t think of a good blue to pair with it. I thought a pale yellow or a pale pink would do well with it, but since I really don’t care for yellow, pink it was.

So at my local Super Joann there’s this muslin that’s suuper fine and see through and floaty and makes me think of Regency right away.

Well.

I didn’t go to the Super Joann. I went to another because it was on my way somewhere on a Friday night and I really wanted to get started that weekend. I bought the finest muslin I could find, thinking I had misremembered the fabric, and some light pink RIT dye. Several weeks later while at my Super Joann I found that I hadn’t misremembered, the other Joann just didn’t have it and boo I was already way too far along to start over. Boo impatience.

Anyway, I wanted a suuuuper pale pink, so I did like… 1/8th of the recommended amount of dye. It turned out pretty bright 8D I don’t even know.

Right so! My inspiration dress:

Here on pinterest (Augh since the update I can’t get the embed link to work

Take a good look.

Now forget all the details.

‘Cause that’s what I did pretty much.

Read more